Thursday, April 21, 2011

The Never Ending Aqua China Cabinet


The Never Ending Aqua China Cabinet
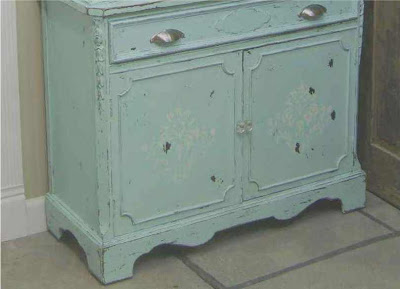
This is one of those pieces that just simply wouldnt end...I had been working on this for over a month.  This was a dark mahogany china cabinet that my clients had picked up at a garage sale in Santa Fe. The owners of this are a young modern family and wanted a fresh new look for the cabinet. One of my friends, an architect, was redoing their kitchen and suggested that instead of ditching it, he knew someone who could give it a new update. ( Thanks Mark). 

I have been working on this cabinet no joke for over a month. Thankfully Mark has not finished the kitchen yet, so apparantly my procrastination was over looked. 

The only thing they said to me was we "want to keep it crisp and clean, we want it to be a focal point but not so bold that it doesnt blend in"

I used their fabric choice for their curtains as my inspiration. Heres a little closeup:


It's always important for me to constantly remind myself, (its not for me) but for the client. " The Parker family" was a young hip family that just wanted a "crisp clean look". About 90% of the time I remove and replace the hardware. In this case,  I removed all the original hardware ( knobs, drawer pulls) and replaced them with a combination of modern drawer pulls, and then added vintage glass knobs. The combination is something I dont normally do but I think in this case it works well.

I created a custom color from mixing two different eco friendly latex paints together. Recently I have been using a line of paint from Benjamin Moore, called the Natura Line.

I have really enjoyed using this brand and do recommend it, its gets great coverage!

I gave the cabinet a good 2 coats of paint. I then got out my trusty sandpaper and scuffed away. I wanted to add just a little something pretty to it, so I decided to add a simple floral stencil to the bottom portion of the hutch. I didnt necessarily want it to be a bold statement, more understated. So I did it in a flat white, so it shows up, but sort of a little suprise.

I think in the end, it came out beautifully.....what do you think?


Monday, April 18, 2011

Simply Classic Distressed White Dresser

What fun it is to have my pieces selling in a store in Boulder. I am going away for Easter break and I have been working on a bunch of different pieces heading to a fabulous furniture store in Boulder, named Clutter! I just love that name!

Clutter is such a cool store to be in. They have such an ecclectic mix of modern, vintage, retro, current and contemporary furniture and at great prices!

A true dumpster diving find, it was a dark wood color, not all that pretty, but now.... well you can see!


The dresser has some neat features which makes it extremely versatile.  If I lived in a bigger place I would snag this up and use it in my dining room as a buffet. The reason I say buffet, is behind the center drawer are 3 hidden pull out drawers.


Lots and lots of disstressing on the edges and on the drawers.  hated the original hardware and replaced them with another set I had saved from another dresser.

And just for an added touch I added the glass top to it, recycled from an old glass door which I just cut down to size.

Stay tuned for some new pieces heading to Boulder, not my typical style, these up and coming pieces were just for fun!


Sunday, April 10, 2011

Crazy Hazy Sunday...Too Much to Do...

Sunday fun day, more like crazy hazy Sunday.... I usually hit the dumpsters on the weekends but boy oh boy this weekend was just so jam packed with things going on, I'm surprised I managed to get dressed...First off I received about 20 different calls for custom work this weekend, which is a huge amount, for someone who does absolutely no advertising.  I guess you can never count out "word of mouth".

Luchia's Desk:
I have been working on a bunch of different projects and once I seem to be finished I just want to do just one thing more.  I am just about complete with that custom order for that old antique desk, I'm not sure if anyone remembers but I had refinished it, but then sold it to a woman who wanted it painted. I have not painted a desk in about 6 months and I completely forgot how much work is involved.  For such a small desk you would think it would be a piece of cake, BUT its finished on all sides and I had to paint it in sections, let it dry, flip it, and so on until all sides were done...that's done, now time to antique it a bit and hand paint it.....goal #1 finish that desk by Friday!

Clutter:
Well this is fab news for The Recycled Rose, aka me. One of the many phone calls this weekend was from a lovely gal in Boulder who owns a furniture store. She had seen some of my work from a customer and inquired about carrying some of my pieces in her retail store....so fab fab news...just means I need to finish up some more "in process" pieces.

Karen's Bookcase:
Also working on a short wooden bookcase, for another custom order for a lovely gal named Karen who wanted a fun piece for her home office. You have to love when customers are open to anything and just want something pretty and different and as she stated so eloquently,"anything but a boring brown bookcase"...so today it got stripped. This is what it looked like before...check out finished piece this week.


Finish Painting kitchen :
Yeah that started but soon fell through as I had to prime a bunch of furniture someone so kindly left outside my door this weekend. What fab finds you say, well no hunting this weekend, it seems being known as the "garbage lady" has its benefits. Benefit one being furniture just shows up. Downside #1: I am surrounded by furniture, things stacked on top of each other with maybe a walkway in between....( Reminder, look for studio space).
Fabulous Sunday Finds:
Today I got some great pieces:
Nice nine drawer dresser ( dovetailed drawers)... already primed and standing on it side in my living room due to lack of space....
Tiny Little nightstand and a little narrow bookcase...all tied with ribbon and left on my front porch...
Finished something:
Yes that would be the drawers from Luchia's desk, stripped, primed, painted, and yes they are stacked on my couch....see Sunday was relatively productive...lol!

With all things happening this weekend, sometimes I wish there were just more hours in the day, am I the only one who wishes she could make time stand still?


Wednesday, April 6, 2011

Inspiration at the Grocery Store!

A single rose can be my garden... a single friend my world. - Leo Buscaglia

I have been making a conscious effort to work outside of my studio at least 3 times a week, that way I get my daily dose of witty banter and my daily dose of sunshine or I may just wither away.

Wednesday has turned out to be a noteworthy day for me that I just had to share a bit of inspiration. I was blessed with simple pleasures of friendship and giving.


Sometimes when you least expect it inspiration knocks you down and says" HELLO?! Wake up and see what God has given us!"


 As I was sitting down on my laptop ( of course after I grabbed a latte), I ran into an old friend of mine from the neighborhood that sat and joined me for the afternoon. I just love surprises, especially when it comes in the form of an old friend.


 The floral department was getting ready to shut down close to 5pm, so the manage asks me if I would like any of the flower bouquets, she was going to throw them out! ( unthinkable to me). She gave me close to 12 bouquets, roses, sunflowers, mixed bouquets, so beautiful..(being a pathological picture taker I couldnt help but snag a bunch of photos of all my goodies).


As I was walking home I came upon a homeless woman who asked me if I could spare some change, and although I couldnt donate to her I handed her a rose... and she handed me a gift, one you cant buy but one that warmed my soul..... a smile!


Inspiration comes in all forms and today I was blessed with a gift from a stranger, a surprise friend, and a smile from a stranger, all of which has left me with a warm heart.

Saturday, April 2, 2011

Saturday Trash to Treasure Finds..

 I just love weekends in Capitol Hill, the stuff people throw out still amazes me....For example: check out this antique desk somebody threw out this weekend. I cant wait to start working on this, I have a customer who has been searching for an old antique childs desk to add to her victorian home.....thank you lazy person in Denver!

Better yet, same alley, same dumpster, I found this gorgeous set of old antique stacking wicker baskets....I seriously start to wonder what exactly people are thinking when they leave these things behind....

My personal favorite this weekend is this solid wood bookcase left in an alley....Its a short bookcase but I of course will be shabbying and disstressing it to death...
I have secretly been itching to do a fabric and bright colored shelf for some time now using this wonderful vintage aqua fabric I snagged at a thrift shop, this will be the piece I work on next.....

I am thinking I will paint the outside of the shelf a nice tourmaline aqua color and line the back with the pretty vintage fabric. I will do an antique cream for the shelving, and hopefully it will find its way to someones home.

Friday, April 1, 2011

Not So Shabby Chairs....Dont be afraid of Color, shabby isnt always White!


When looking to update your style sometimes all you need is the perfect chair. I found these chairs as part of an old dining room set. They needed work, none of the chairs had cushions on them, and they were definitely scuffed up a bit.

I re sanded all the chairs, (2) arms and 2 straight back. I custom fit the cushions and added this pretty vintage petite roses floral fabric I had lying around. I ended up purchasing the fabric ( was an old twin flat sheet, for $1.00 at  a thrift store)
I painted the bases different colors, some blue, some white, and some a pretty vintage plum color....I enjoy painting in a shabby chic style however sometimes white is blah and you can achieve a lovely vintage feel with color, its just a matter of choosing the right color.

After: Pretty Vintage Blue

After: Pretty Antique Plum with Floral Detailing


Friday, March 25, 2011

Eco Friendly Easter Project #2: Re Purposed Petite Floral Posies


Eco Friendly Easter Project #2
 Re Purposed Petite Floral Posies

Pretty petite floral posies created from up cycled fabric. What does that exactly mean? In simplest terms this fabric "used to be" something else. I am a huge hoarder of fabric but I really enjoy purchasing thrift store finds, pretty fabric designs that I adore, that perhaps may be an old pillowcase, tablecloth, sheets, a stained t shirt, etc...

Ivory Posies created from torn sheets


Here's a fab find for just 25cents. It was a set of pillowcases in this classic red and rose toile.

I call these "petite posies" because they are unique, and cut by hand, not by a die cutter, so they vary in shapes and sizes. Simply created by cutting a variety of circles out of different materials, layering one on top of the other, and sewn with a button in the center.

Some Shabby Cottage Rose Posies


Floral & Denim Posies created from denim jeans & a torn apron


I use these for a variety of purposes. I use them as embellishments on other projects, or simply as holiday packaging (instead of a bow), or I attach pin backs to them to create unique pins.

Enjoy my eco friendly project #2, make sure to leave a comment below and share this post with friends. You can find full details on points being awarded in my original post entitled " Chirp Away" Eco Friendly Easter Give Away Contest.


Thursday, March 24, 2011

Eco Friendly Easter Project #1: Jellybean Napkin Rings

Eco Friendly Easter Project #1: Jellybean Napkin Rings

Nothing transcends the term eco friendly than something that is edible. Anything which can be consumed with little to no waste is the epitomy of being eco friendly.  Old fashioned and unadulterated these napkin rings are a must do craft with the kids for Easter.
These remind me of making popcorn garland with my grandparents as a child, and whenever you can elicit childhood memories from a craft, I am all for it.

Simple as pie to create all you need is some wire and jellybeans. Just as it looks all you do is string the jellybeans through the wire. I like to do about (2) turns through. Taking a pencil, just twist the ends to make curls and wrap them around your napkins ( this part is for mommies).

Just a hint for mommies, you may want to keep an extra handful of jellybeans in stock, as more will end up in little tummies than will end up on the wire.
Enjoy my eco friendly Easter craft #1. Make sure to comment below the post to earn points for the "Chirp Away" Eco Friendly Easter Give Away Contest. Share with a friend to earn even more points. Click here to find out how YOU can join in on the fun.

Monday, March 21, 2011

"Chirp Away" Eco Friendly Easter Give Away Contest!


I think its time for a give away contest! For the next two weeks I will be doing a simple blogging contest. Each day for the next 14 days I will post a new eco friendly Easter themed craft.

Here's the details:
It will work on a simple point system.

Earn points the following ways:
  • Get 5 points for each comment left below one of my projects. (One per day allowed).

  • Get 15 points for sharing the post (either on facebook or twitter). ( Just leave a comment with a link to the posting. You must link back to the original post.)

  • Get 20 points for re posting the project on your blog. You must link back to the original post. (Just leave a comment with a link to the post).

  • Earn 25 points for becoming a follower.

  • Earn 50 points for each person you refer to follow me. ( Simply leave a comment with the name of the person you referred to me).

  • Earn 75 points for placing our blog contest button on your website or blog. (Just leave a comment on the blog with a link showing where the image is placed on your page. If you right click our image you can copy and paste it to your site).

I will update point totals on a daily basis and you can see your point total on the right hand side of my blog under "Chirp Away Contest". At the end of the 14 day period, the person(s) with the most points will win. I will offer a total of 4 prizes: Grand Prize, First Prize, Second Prize, Third Prize. The Grand Prize winner will receive (1) of every project featured for a total of 14 projects. First prize winner will receive a $35 Gift Certificate as well as a gift basket featuring eco friendly companies and products made in Colorado. Second prize will receive a $25 gift certificate. Third prize winner will receive a $15 gift certificate.


The contest will begin on March 23rd and end on April 6th. Winners will be announced on April 8th.
The contest is open to anyone anywhere. I will ship prizes at no cost to any US customer. Please note for international participants, I must charge for shipping. In an effort to be fair, I will cover the difference between US Shipping and the cost to ship internationally.


Wednesday, March 16, 2011

Cute as a Button.....Upcycled Button Earings

One of my best loved embellishments to craft with are buttons. I have been compiling buttons for years, I even take them off of old clothes.  They are one of the simplest things to up cycle. My stash of vintage buttons have been overflowing lately, so I decided to purge a bit of them.
Next to an empty house and a glass of red wine followed by a bubble bath, the only thing that truly relaxes me is to sit in my studio and create. Yesterday I had one of the worst Tuesdays in years, so in order to decompress I needed to create something so I grabbed one of my jars of buttons.
As I emptied out the mason jar I realized I had a w bunch of these tiny white shirt buttons. Little buttons are great for cards. So I did a bit of sorting, grabbed a handful of the white buttons, then a few sets of mini colored buttons. Picked up a few of the silver toned fancy buttons and to work I went. I wanted a simple craft that would occupy enough time and still fulfill my need to diversify. I decided to make a few pairs of button earrings.  Button earrings are a really simple project to do.
The first pair I made I used a medium sized pale grey blue button. They came out really cute with a vintage appeal which I just adore. Every year I do about 15 different art and craft shows and these simple earrings have always been great sellers for me, easy to display on cards, in a pretty basket.
I decided to do a set of silver toned button earrings as well. If your like me you and have a jar of buttons lying around, I'm sure you have some silver buttons in the mix. These and the older gold tone buttons make great little earrings or simple pins.
And just for giggles I made about 10 pairs of these cuties. I think these would be just precious for a young girl.
Enjoy the simple things and nothing could be easier than earrings that are "Cute as a Button".

Saturday, March 12, 2011

Dumpster Dive Much?


The inevitable question always arises: Do you dumpster dive? An answer I can clearly say, YES YES YES: I freely admit I am a dumpster diver! You know the feeling when theres a great sale going on in your favorite thrift store and you just cant resist buying that shirt because it is a whopping 50% off. I get that feeling every single time I walk through the city of Denver. I just cant resist walking through the alleys in Capitol Hill checking to see what great trash I can turn into a treasure.

With that note, this blog is about my journey as an artist and designer to create as much as I can with recycled materials and turn your trash into my treasure.

I hope you will enjoy my journeys in creating shabby chic recycled treasures.