Wednesday, September 12, 2012

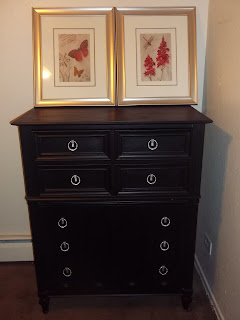
The Marilyn Monroe..Shabby Modern Black Tallboy

I have had one of the busiest months ever and it looks like it may continue on for me. Havent posted in a while but thought I would share a recent piece completed. I have been so inundated with custom pieces that I have only been able to do a few pieces on my own. Well this is a piece I am very proud of, especially when you see what it used to look like...

This is the before..

Now see I loved the look of the dresser, just hated the natural wood color, so a simple color change of a soft custom mixed matte black, created from recycled paint and instantly...an amazing change..I kept the original hardware, just painted them a silver matte, which now makes the hardware take center stage.


The interiors of all the drawers have also been painted a nice antique white which is such a nice contrast to the black. And for a few more after photos....
A couple of closeups...


If you are interested in this piece, it is for sale, and you can view more photos, dimensions, and more in my online store, The Recycled Rose.
www.therecycledrose.com


Tuesday, August 14, 2012

Good Morning Sunshine! Before & After Sunflower Adirondack Chairs..

I could not even start this post without including this adorable photo I snapped on Sunday morning.....Good Morning Sunshine!

Its my little marshmallow, my neighbors little boy I just love to death, woke up early Sunday morning to find that lil marshmallow escaped out of his house and was perched at mine. Just chillin and relaxin, he looked so guilty and so adorable I couldnt help but snag a pic.

Not complete but I had spent the entire day working on these adirondack chairs, damaged by hail, there were these little indentations all over the wood. There is also a tiny little table that came with the set, totally worn and weathered.  A quick look at the before...


Lots of filling in the holes ( you can see that part now), and a bit of sanding, and a whole lot of sunshine and these chairs went from blah to wow, with a few strokes of paint.

Just a simple color change and the chairs already looked amazing...completely different!


Add in a little sunshine....

No two the same, coordinating but never exactly alike..

Add some highlights...

Now for a little change, slanted the second flower a bit, never like a different point of view
Now for a little personalization...


And the result is a recipe for adding a little sunshine to your yard....complete transformation...

whoala, super fun and bright newly refurbished sunflower adirondack set!


Saturday, August 11, 2012

Russian Dolls Changing Table: Part 1

It all starts with a simple idea, and this adorable little idea came from a simple swatch of fabric. A customed designed little baby girls nursery set with tiny matroyschkas painted on them. I love when parents think outside of the box when it comes to nursery themes and this is by far one of the most creative. Im not completely finished with it, but it certainly has come along way...

In the beginning there was a dark wooden changing table that simply did not work for a little girls nursery set...

And it all began with my customer finding this lovely handmade blanket:

It is handmade from Sewbrookstone on Etsy and has this adorable littl russian doll pattern, super cute! My customers husband proposed to her with one of the dolls, and now they are having their first daughter, I love it when theirs a story to the theme... and this is a great one...

Now back to the changing table, the room has been painted a bright yellow with white trim, but I wanted to create a custom designed set, and what better way than to create from this great pallette of color!

So I did a nice bright bubblegum pink trim, with bright white as a base...

Then for the details...
I made some lovely daisy appliques and added them to the center of the piece...

Added some lovely scrolls to the sides...


Now not completely finished but my plan is to create (2) large russian dolls and place them on the front drawers. Im going to add a lovely scroll and flower vine around the border of cabinets and paint the hardware white. ( Thats part 2)

But already the piece has completely transformed itself...stay tuned for part 2.

Sunday, August 5, 2012

My front yard looks like Im having a Yardsale...So much Work So Little Time

July has been a very busy month for me. I started back up painting furniture again and holy wow, I forgot how quickly you get full of stuff. This week alone I had a ton of drop offs...alot of works in progress, and now my front yard looks like Im having a yard sale.
Ok, so what am I working on now, everything but the kitchen sink!
First off, I have been steadily working on desk and a hutch for a young girls bedroom. I have (3) full sets of adirondack chairs all with ottomans and tables, as well as another (2) full childrens nursery sets, lots and lots to do...

Happy August...lol!

Monday, July 23, 2012

North Carolina Dogwoods Arrive in Denver...New Adirondack Chairs

I paint because it is in my soul, it is the one medium that nomatter what is going on in my life, it soothes my soul. This is my first post in a little over a year, and my first creation. I cannot even begin to explain how important these pieces are to me. I hope that you can see part of my soul in the chairs, yes, I know they are just chairs.


My very first client, Kelly, wanted an original set of outdoor chairs for her patio. I had given her a sample of a porch chair I completed nearly ten years ago. The design could not have been simpler, one color base with a giant blown up flower. Although the design was simple, it is timeless and works with whatever color combination you like, bold and bright, soft and subtle, pastel, cool and classic.

When working with custom orders, I always have to find a way to make it personalized. It doesnt matter if I connect with the piece, the purpose is for you to connect with the piece. For the life of her, she could not come up with a flower she loved. She is originally from North Carolina now living in Denver, so I suggested the state flower for North Carolina. She just LOVED that idea. The dogwood flower is similar in shape to a cherry blossom, except traditionally it is a white flower.


Now for the "not so fun" stuff. Colorado is known for crazy storms. This is a photo of her "before" chairs. They dont look all that bad, solid wood, well made, great starting point...but...not quite. They were damaged in a hail storm a few years back, so there were these tiny indentations in the wood which needed to be evened out. Just a little wood putty and some extra sanding and a really good coat of primer and they were back in shape!


On a personal note, I have an aversion to doing white anything on red bases, it always reminds me of christmas, so to avoid that whole holiday look, I custom mixed a deep cranberry, almost purple color with a subtle brown to create the rusty terra cotta color. (granted in the light it looks rose, its actually a deep cranberry with a hint of brown).


After coating the bases of the chairs a few times, I decided to do some detailing on the arms of the chairs, so I created a custom stencil from an image online of cherry blossoms an tiny vines, and did some tiny tiny vined flowers. It took forever to create because they are so small but they added such a nice detail that I ended up doing it on both chairs.

Now the trick when it comes to doing outdoor furniture is to be realistic. You want the piece to be pretty and detailed but at the same time you know its going to be outdoors, so you dont have to be overly detailed in your paintings ( noone is really going to see those extra details). Big bold and simple is the way to go with outdoor pieces, some detailing to give it dimension, but nothing extraordinary, keeping that balance can take some time.

Both chairs came out fabulously! The first chair I put the dogwood smack dab in the center. The second chair, however, I did even larger than the first flower, but placed it a bit off center, so that the flower takes up the majority of the background of the chair, but is much longer.

Whether paired up as a set or separated out as individual chairs, these are a great way to add a little flair to you patio furniture!

Saturday, July 21, 2012

Cardboard Ornaments Straight from Your Kitchen! Christmas in July...

Yes, I know the title of this post is a little strange, however it is what it is. This is a really cute project I used to do with my old students in my studio and I completely forgot about it until I recently found an old cd with photos from my old art studio, and there it was, a picture of my kids holding up their easy ornaments. Now I know this may seem very "childish", however I still think its really cool, very easy and kid friendly. I also happen to really enjoy the "rustic" side of paper crafting and recycling, so I really tend to enjoy seeing anything in its "natural" state.


Alrighty then supplies needed to begin:
Dried Beans, Peas, Chic Peas, White Lima Beans ( basically any colored dried beans), rice, works well as does dried berries, salt ,pepper, oatmeal, essentially NOW IS THE TIME TO DIG THROUGH YOUR KITCHEN!
Twine
Coloring Book Pages
Glue
Feathers, Ribbon

Instructions:
1. Copy coloring book pages( animals, shapes, etc) and use those as templates.
2. Trace and cut your shapes onto cardboard and cut out.
3. Decorate with dried goods.
4. Tie a little piece of twine or ribbon to hang or add a simple little bow to your designs.

KIDS LOVE THIS! ITS SO EASY AND MAY I SAY CHEAP CHEAP CHEAP!

One more picture for the road- and I certainly hope you will all try this one at home- great to do with your children!

Friday, July 20, 2012

3D Simple Snowman Ornament Gift Tags...Its Christmas in July!

I start working on projects for Christmas early as can be....these are one of my old standby projects. So simple to do, and a great way to get rid of scrap material.


I wish for snow days! But I live in Colorado, and it snows all the time here- I miss snow I can play in, the air here is so dry that its so difficult to even build a snowman, and it usually melts away the next day! But I love snowman!

So Simple to do, but simply adorable!

Supplies Needed:
1. String or ribbon
2. Cardboard (Use leftover cereal boxes, postal boxes, whatever you have on hand).
3. Googly Eyes ( or black pen)
4. Scrap Patterned Paper
5. Glue
6 . (1) 12x12 Sheet of White Cardstock
6. Optional* 2 inch circle punch, 1.5 inch square punch ( If you dont have these, flip a bottle and trace it)

Instructions:
1. Punch or trace and cut 6 2" circles out of cardboard.
2. Punch or trace and cut 6 2" cirlces out of white cardstock.
3. Adhere White circles directly on top of cardboard circle.
4. Punch or trace 6 Squares out of cardboard.
5. Punch or trace 6 small "brims" out of cardboard.
6. Adhere leftover scrap paper onto squares, and brim.
7. Then its just a matter of glue and paste, one on top of the other.
8. Attach a small scrap orange piece for the nose, a few black dots for the mouth, and googly central for the eyes!
9. Then simply attach ribbon, add a few little embellies, and whoalla- easy snow buddy tags!

*I really like to use actual cardboard like from a postal box, versus a cereal box, or chiboard like material, it adds nice dimension and makes them look 3d".

Thursday, June 28, 2012

Im painting again!

After a long year of not doing anything that even remotely represents me, a separation due to domestic violence, a year of living in shelters, a loss of children, and a loss of what actually represented me. I have not posted in forever, but thats about to change. Thanks in part to a close friend of mine and a very cool grief counselor. So now the Recycled Rose not only represents the work I do, but now represents me.

Im so excited to say I am painting again!